pGLO Transformation Lab: Genetic Engineering with GFP & Ampicillin
Learn how the pGLO plasmid is used to genetically transform E. coli, express green fluorescent protein (GFP), and demonstrate key biotechnology principles.
Introduction to Genetic Engineering and pGLO
Genetic engineering allows scientists to change the DNA of living organisms. One of the most popular beginner experiments in biotechnology is the pGLO transformation lab. In this experiment, you insert a gene that makes bacteria glow under UV light. I had the chance to perform this experiment at the University of Toronto, and it showed me how powerful genetic engineering can be.
If you're a student or teacher interested in biology or just want to understand how scientists engineer genes in real life, this guide breaks it down step by step.
How does the pGLO plasmid work?
The pGLO plasmid is a small, circular piece of DNA made in the lab. It carries several genes that give bacteria new traits:
bla gene (β-lactamase): Makes bacteria resistant to the antibiotic ampicillin. This gene is always active
It creates an enzyme that hydrolyzes (uses water to break) ampicillin bonds
araC gene: Acts as a switch. It controls when the GFP gene is turned on, but only when a sugar called arabinose is present.
The araC gene encodes a regulatory protein that binds arabinose, activating GFP transcription (learn more: The AraC Regulator - Biology LibreTexts).
GFP gene (green fluorescent protein): When active, it makes the bacteria glow bright green under UV light. It was originally isolated from the jellyfish Aequorea Victoria (learn more: Osamu Shimomura (1928–2018)).
The pGLO plasmid also includes:
Origin of replication (ORI) – So it can copy itself inside the bacteria
Multiple cloning site (MCS) – Where scientists can insert other genes
Together, these elements let scientists both control and observe gene expression in real time.
Why Use E. coli?
E. coli is commonly used in labs because it grows quickly and is easy to modify. In the pGLO lab, E. coli is the host that takes in the plasmid and expresses the glowing gene.
Step-by-Step pGLO Transformation Lab Guide
Materials:
E. coli bacterial culture (non-transformed, competent cells)
pGLO plasmid DNA (contains GFP, bla, and araC genes
LB broth (Luria-Bertani nutrient broth) – for bacterial recovery
LB agar plates:
LB only (control)
2 LB + ampicillin
LB + ampicillin + arabinose
Ampicillin – antibiotic used for selection
Arabinose sugar – turns on the GFP gene
Transformation solution (CaCl₂ or equivalent) – makes E. coli competent
Sterile water (for dilution or rinsing)
Apparatus:
Micropipettes and sterile pipette tips
Sterile inoculating loops or disposable spreaders
Sterile tubes (1.5 mL microcentrifuge tubes or test tubes) – for +pGLO and –pGLO samples
Ice bath or crushed ice – for keeping cells cold during preparation
Heat block or water bath (set to 42°C) – for heat shock step
Incubator (37°C) – to grow bacterial colonies
UV light or blue LED light source – to visualize GFP fluorescence
Gloves and safety goggles – for proper lab safety
Permanent marker and labeling tape – to mark your samples clearly
Procedure
1. Prepare the Bacteria
E. coli that naturally do not glow or resist antibiotics are grown in nutrient broth. Cells are spread onto agar plates and grown to obtain isolated colonies.
Transfer 250 microliters of Transformation Solution to two microcentrifuge tubes using a sterile micropipette. Lable one tube +pGLO and one -pGLO.
Place the tubes on ice. The ice helps the cells stay stable before transformation. The tubes may be taken off to conduct the following steps but they must be returned to the ice.
For each microcentrifuge tube, use a sterile loop to pick up one colony and spin it within the microcentrifuge tube to disperse all of the bacteria.
This will treat the cells so that they are competent and will take in foreign DNA. The Ca²⁺ ions neutralize the negative charges on the bacterial cell membrane and DNA, reducing electrostatic repulsion.
2. Add the Plasmid
Observe the plasmid DNA under UV light and record observations.
The pGLO DNA is added via a loop to the +pGLO tube (there should be a film on the loop after submerging in pGLO DNA).
Close both tubes and push them down the rack so they have direct contact with the ice. Let it incubate for ten minutes.
3. Heat Shock
Submerge both tubes in a 42°C water bath for 50 seconds, and then place back on ice. This temperature jump opens pores in the cell membrane so the plasmid can enter. Ice closes the pores back up to prevent cell contents from leaking out. Let it rest for 10 minutes.
4. Recovery
Add 250 microliters of LB broth via micropipette. This helps them recover and start expressing the plasmid genes.
5. Plate the Cells
The cells are spread onto agar plates containing ampicillin, and in some cases, arabinose. Pipette 100 microliters for each plate and then skate with a sterile loop.
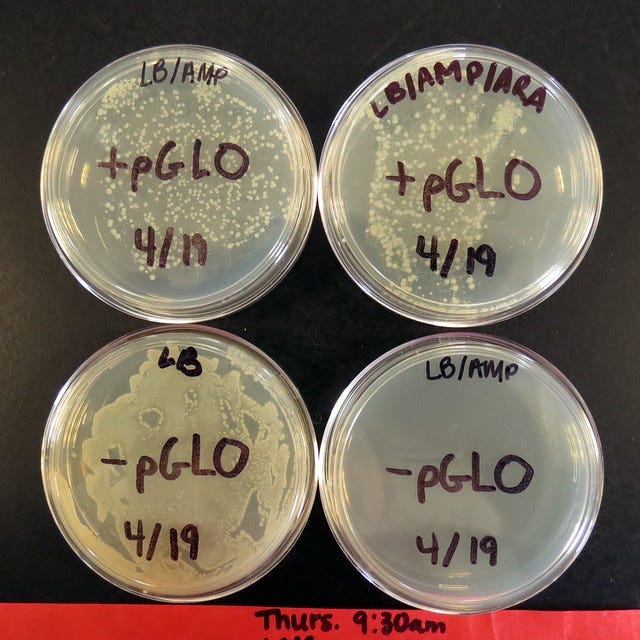
The following plates should be set up:
+pGLO, ampicillin
+pGLO, ampicillin, arabinose
-pGLO, nothing
-pGLO, ampicillin
Incubate at 37°C
6. Check the Results
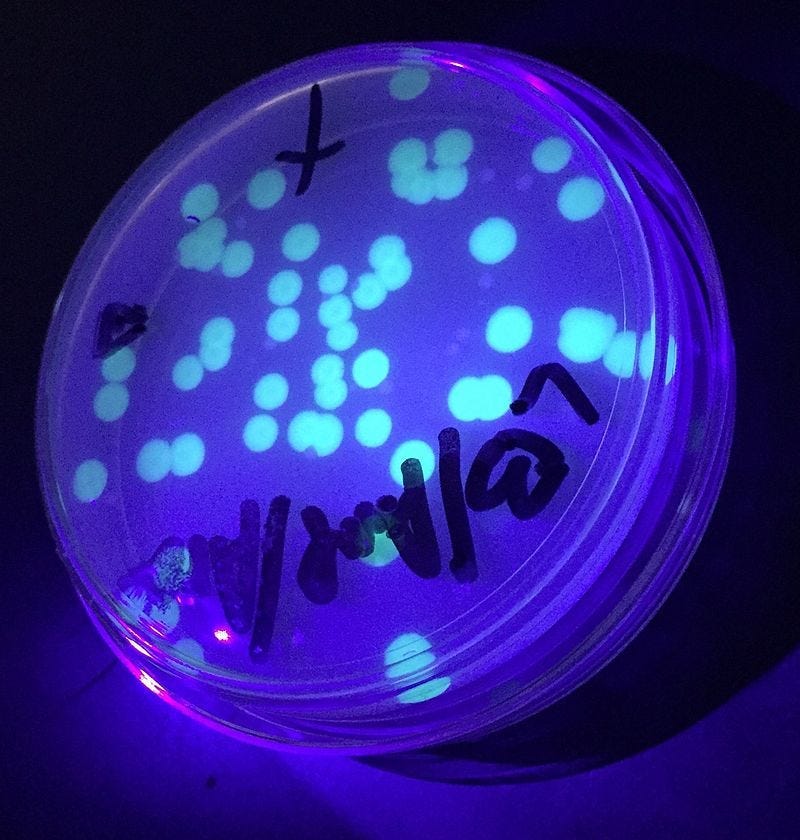
After incubation, observe the plates under UV light. Glowing colonies in the +pGLO with arabinose means the transformation worked.
pGLO Lab Results Explained
These should be the general results of the experiment if done correctly:
+pGLO with arabinose and ampicillin
Bacteria grow and glow green under UV light
Both antibiotic resistance and GFP gene are active
+pGLO with ampicillin only (no arabinose)
Bacteria grow, but don’t glow
Resistance gene works, but GFP is off
–pGLO with ampicillin
No growth
Bacteria were killed by the antibiotic
–pGLO with no antibiotic
Bacteria grow, no glow
Educational Significance of pGLO and GFP
The pGLO lab is one of the best beginner experiments in molecular biology and genetic transformation. Here's why:
You see the results of genetic modification with your own eyes (fluorescent glow)
It demonstrates gene regulation, not just insertion
It shows how antibiotic selection works in real lab settings
It introduces key terms like plasmids, promoters, and transformation in a hands-on way
Whether you're in high school, college, or just curious, the pGLO lab gives you real-world insight into how modern genetics is done.
Final Thoughts on pGLO and Genetic Engineering
The pGLO transformation experiment is more than a cool lab with glowing bacteria. It teaches the fundamentals of biotech, gene expression, and how we can use genetic tools to study life. From antibiotic resistance to fluorescent proteins, these building blocks are used in real research and even in medicine.
This lab helped me understand how scientists work with genes and it got me excited about what’s possible in the world of synthetic biology and biotechnology.
The pGLO experiment demonstrates how genetic engineering unlocks real-world applications from antibiotic resistance research to synthetic biology. Ready to try it? Download the full lab protocol here.
Read more about gene editing for cystic fibrosis!
Gene Editing: The Key to Unlocking a Cystic Fibrosis Free World
Imagine having a child knowing they only had forty years to live, a mere half of the average human lifespan. You watch them grapple with recurring bouts of pneumonia and intestinal blockages. They endure continuous a…
FAQ on pGLO Transformation
1. Why is E. coli used in the pGLO experiment?
E. coli is the model organism for bacterial transformation because:
Rapid reproduction (doubles every 20 mins in LB broth)
Easy to genetically manipulate (takes up plasmids efficiently via heat shock)
Non-pathogenic strains (e.g., DH5α) are safe for student labs
2. What’s the purpose of arabinose in the pGLO protocol?
Arabinose is the inducer molecule that activates GFP:
Binds the araC regulatory protein, flipping the promoter "on"
Without arabinose, the GFP gene remains silent (no glow)
Demonstrates gene regulation in real time
3. Why do we use ampicillin in the agar plates?
Ampicillin acts as a selective agent:
Only bacteria with the pGLO plasmid (bla gene) survive
Kills untransformed E. coli, proving successful transformation
Teaches antibiotic resistance mechanisms (β-lactamase enzyme)
4. What if my bacteria don’t glow under UV light?
Troubleshooting tips:
Check arabinose concentration (typically 0.2% w/v in LB agar)
Ensure proper heat shock (42°C for 45 sec exactly)
Verify UV wavelength (~395 nm for GFP excitation)
5. Can pGLO work without the heat shock step?
No, heat shock is critical for:
Creating pores in the bacterial membrane for plasmid uptake
Alternative methods (electroporation) require specialized equipment
6. How is pGLO used in real-world research?
Beyond classrooms, pGLO teaches core techniques for:
Synthetic biology (e.g., designing gene circuits)
Vaccine development (recombinant protein expression)
Biosensors (linking GFP to environmental triggers)
7. Is GFP safe to use in student labs?
Yes! GFP is non-toxic and:
Requires UV light to fluoresce (no chemical stains)
Approved by education boards for Biosafety Level 1 (BSL-1) labs
8. What’s the difference between transformation and transfection?
Transformation: Inserting DNA into bacteria (e.g., pGLO + E. coli)
Transfection: Delivering DNA into eukaryotic cells (e.g., human cells)
Related Concepts in Genetic Engineering:
CRISPR-Cas9 gene editing
Antibiotic resistance markers
Reporter genes (like GFP)
Bacterial conjugation vs. transformation
This article is a repost of one of my previous Medium articles that I wanted to move here. I’m also experimenting with SEO (hence the FAQ and related concepts sections).


This piece clearly shows how the pGLO experiment makes gene expression and molecular biology concepts tangible. Using glowing bacteria to demonstrate DNA to protein expression is a powerful, memorable teaching tool.
Love this! Super in-depth :)